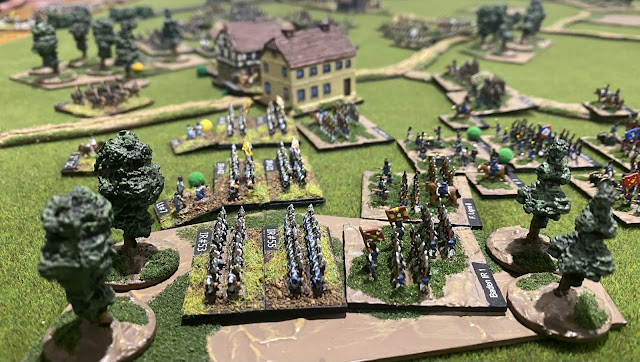
In this week’s engagement four players deployed for a fictional engagement set in 1809, nominally just prior to the Battle of Wagram.
The situation in late June can only be described as confusing. Archduke John’s recent defeat at Raab had been unfortunate but it also revitalised him. Soon after he moved, with vigour, to reinforce Archduke Charles north of Vienna. As he moved he collected portions of Charles army previously detached. Yet, Napoleon had been busy too. Aware that John was on the move, he intended to drive a wedge between the two armies. In early July, as John neared Charles, Napoleon moved to attack John.
The Emperorer had his disposal what at best could be described was a mixed force. The main elements of his available forces comprised four infantry divisions from Messena’s IV Corps. These were bolstered by two divisions from Davout’s III Corps. These six divisions were further reinforced by a hasitily assembled reserve comprising the 2nd Saxon Division, a Heavy Cavalry Division and a division of the Young Guard.
It was already late in the day and with daylight limited Napoleon determined to act decisively using Davout’s elite divisions and the Young Guard to smash John’s Austrians at the first opportunity. However, unknown to Napoleon was the extent of the poor Austrian staff work. Instead of being concentrated the Austrians were, yet again, caught in column of march.
Napoleon had deployed with Davout’s two divisions in the centre with two of Messena’s divisions on his left and two on the right. A less than ideal deployment but one bought about by his own haste. In reserve the remaing divisions had formed behind Davout’s divisions.
Archduke John meanwhile was stumbling forward and when he became aware of the imminent threat, just two divisions of Colleredo’s Corps faced Napoleon’s concentrated army. Fortunately the terrain where these two Austrian divisions were located provided a strong defensive position. In its centre was the town of Breitenburg which was bordered on each side by woods.
Battle was joined around 4pm with Messena’s 1st and 2nd Divisions advancing directly on the startled Austrians. Morand’s Division formed on the left while that of Saint-Cyr was on the right, nearer Breitenburg. While Messena pondered capturing Breitenburg by direct assault Napoleon ordered he press the flanks with all haste. As the infantry advanced a 24 gun battery was formed, comprising French and Baden guns. The enemy skirmish screen was driven in and the French and Baden artillery overwhelmed the Austrian guns opposite.
Soon the Austrian line to the right of Breitenburg began to falter and Messena pressed further into the woods in an effort to clear the wood, further exposing the Austrian flank. Simultaneously Napoleon ordered the next stage of his plan, a complex series of seperate attacks, which together he hoped would break Austrian resolve.
On the extreme French left, the now isolated heavy cavalry of Saint Sulpice, pressed the Austrian cavalry opposite. In the centre Rouget’s Brigade of the Young Guard advanced to break the Austrian position near the woods. Even more dramatically a massive assault was launched against Breitenburg which would carrying the town.
Together this series of attacks paid great dividends. The Austrians were driven back everywhere and French success threatened to cause complete panic amongst the Austrian commanders. Yet Archduke John held his nerve.
Austrian reinforcements were now deploying in strength. First were three divisions from Kienmayer’s Corps. The Light Division’s cavalry was sent to the right, while the two Converged Grenadier Divisions deployed to the centre, which was in desperate need of reinforcement. As these formations deployed Austrian resolve stiffened and soon the French advance would start to slow.
Soon the first Austrian counterattacks were delivered, in part by the converged grenadiers. The Young Guard were thrown back with heavy losses, stabilising the Austrian right. Even Breitenburg was recaptured when the Saxon garrison was evicted.
If this turn of events was not enough around 7pm two further Austrian divisions deployed, these from Archduke Ludwig’s Corps with more divisions fast approaching.
Napoleon was furious as his hopes of complete victory were fast evaporating. However, determined to regain the initiative around 7.30pm one final push was made in the centre. Three Saxon regiments surged forward, supported by two French regiments, intent on securing Breitenburg.
Above, three Saxon regiments attack, supported by additional French regiments. Below, the view from the Austrian lines.
The scenario was of course fictional and developed using the Road to Glory scenario system. Each army comprised around 4,000 points of troops. Despite the number of troops involved the battle occurred in a very restricted space with key terrain changing hands repeatedly. Further, several Austrian divisions were on the verge of collapse. Even another hour could have resulted in the Austrian centre breaking, but of course their vulnerability was hidden in the fog of war. As to the commanders, Alastair and Andrew commanded the Austrians while Richard and I the French. The French are from my collection, the Austrians from Andrew’s.


Comments
Post a Comment